is destroyed. Once damage gets through the shields, armor begins taking damage and won't regenerate.
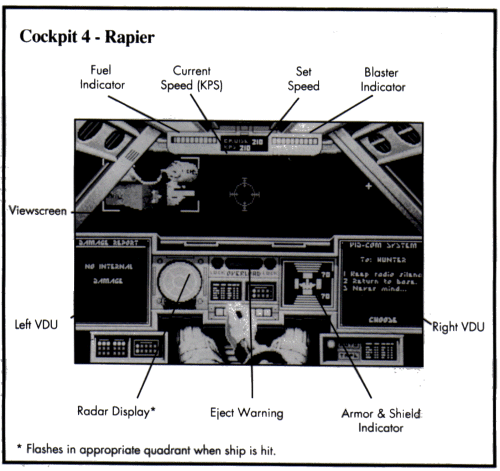
 Fuel Indicator: This bar shows how much fuel you have; the bar becomes shorter as you use up fuel. Afterburners boost your speed dramatically, but use up fuel at a ferocious rate, so use them sparingly. If you run out of fuel, you will only be able to coast on reserves at a speed of 50 KPS. Fuel Indicator: This bar shows how much fuel you have; the bar becomes shorter as you use up fuel. Afterburners boost your speed dramatically, but use up fuel at a ferocious rate, so use them sparingly. If you run out of fuel, you will only be able to coast on reserves at a speed of 50 KPS.
Speed Indicator: The Speed Indicator may be one gauge or two, depending on your cockpit type. "Set Speed" shows the speed your fighter will try to maintain on its own (like the cruise control on an automobile). "KPS" shows your ship's current speed, in klicks (kilometers) per second.
|
Tactical Tip: The safest speed for negotiating asteroid fields is 250 KPS.
Blaster Indicator: This gauge shows the power level of your ship's active gun. Frequent use of the gun runs down your blaster power. Your guns will not fire if you have no blaster power. Guns recover power gradually, and recovery is slowed if your shields are also regenerating.
Eject Warning: This light flashes if your ship has sustained significant damage. When the eject warning starts flashing, you must decide how serious the situation is and whether to eject or not. If you decide to eject, the Confederation will suffer from the loss of a starfighter, but you will live to fight another day.
|